Master the art of glowing skin with this step-by-step guide on how and where to apply highlighter complete with pro tips.
If there’s one makeup product that can instantly wake up tired skin and give you that lit-from-within glow, it’s highlighter. Whether you’re into a glassy K-beauty sheen or a golden-hour shimmer, learning how to apply highlighter correctly can seriously elevate your entire makeup game.
This scroll-worthy guide will walk you through what highlighter makeup is, the different types available, where to apply it, and the makeup steps and techniques to nail your glow—tailored to your skin type, face shape, and even lighting. Think of this as your shortcut to mastering one of makeup’s most magical products, with no glitter explosions or disco ball disasters in sight.
1. What Is Highlighter Makeup?
So, what is highlighter makeup exactly? In simple terms, it’s a light-reflecting product designed to enhance certain features of your face by adding a luminous or radiant finish. The goal? To mimic the way natural light would hit the high points of your face.
Highlighters come in several forms:
- Powder Highlighters: Best for oily or combination skin types. Great for layering over makeup.
- Cream Highlighters: Perfect for drier skin types or anyone who wants a dewy finish.
- Liquid Highlighters: Super versatile—can be mixed with foundation or used as a standalone glow booster.
- Stick Highlighters: Convenient and great for on-the-go touch-ups.
Choosing the right one depends on your skin type and the finish you’re after—subtle shimmer, intense sparkle, or something in between.
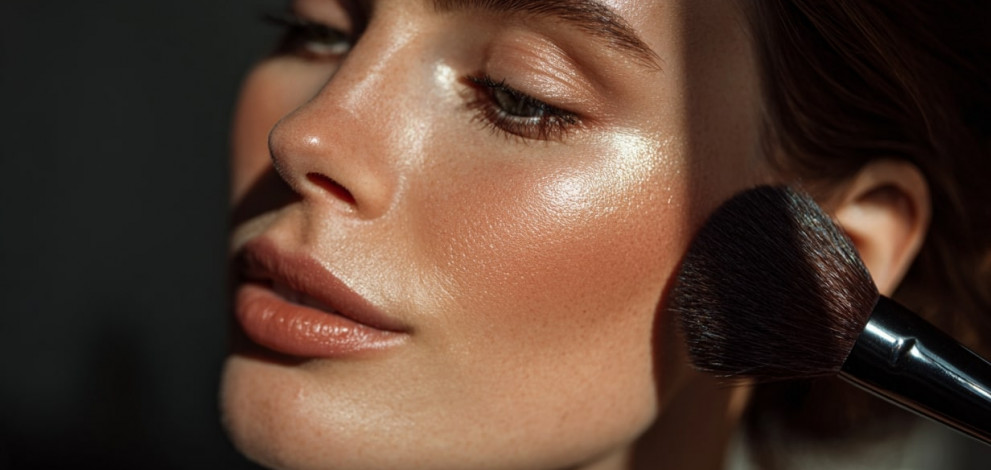
2. Where to Apply Highlighter (a.k.a. The Glow Zones)
Now let’s talk about placement. If you’re wondering where to apply highlighter for maximum impact, the key is to focus on the high points of the face—areas that naturally catch the light.
Here’s where to swipe, dab or tap it on:
- Cheekbones: The classic highlighter zone. Apply above your blush for a lifted look.
- Brow Bone: Just under your eyebrows to open up the eyes.
- Inner Corners of the Eyes: A quick trick to look wide awake, even after a late night.
- Bridge of the Nose: Adds structure and draws the eye to the centre of the face.
- Cupid’s Bow: A dab here gives the illusion of fuller lips.
Bonus glow zones? Try a little highlighter on your collarbone, jawline, or even shoulders for a radiant, body-lit look on summer days or nights out.
3. How to Apply Highlighter Step by Step
Nailing your glow doesn’t need to be complicated. Here’s how to apply highlighter step by step for a seamless, non-streaky finish:
Step 1: Prep Your Skin
Start with a clean, moisturised base. This helps create a smooth canvas without any heaviness before adding highlighter.
Step 2: Choose the Right Highlighter
Select a highlighter that suits your skin type and the finish you want. For example, a liquid highlighter gives a dewy, natural glow while a powder delivers that sharp cheekbone definition.
Step 3: Pick the Right Brush for Highlighter
- Use a fan brush or fluffy tapered brush for powders.
- Use fingertips or a damp beauty sponge for cream and liquid formulas.
Step 4: Apply to High Points
Gently sweep or dab highlighter on the cheekbones, nose bridge, brow bone, and other glow zones.
Step 5: Blend, Blend, Blend
No one wants obvious stripes of shimmer. Blend out the edges to ensure a natural, seamless glow.
Step 6: Check in Natural Light
Lighting matters! Before you step out, check your glow in natural daylight to make sure everything looks blended and balanced.
4. Highlighter Tips Based on Face Shape
Tailoring your glow to your face shape can make a huge difference.
- Round face: Focus on cheekbones and down the nose to create angles.
- Oval face: Stick to classic glow points like cheekbones, nose, brow bone.
- Square face: Add highlighter above brows and on the jawline to soften edges.
- Heart-shaped face: Highlight the forehead and chin subtly for balance.
5. Common Highlighter Mistakes to Avoid
Let’s save you some trial and error:
- Using too much: Highlighter is meant to enhance, not overwhelm.
- Choosing the wrong shade: Icy shades on warm skin tones can look ashy; golden tones on very fair skin can look muddy.
- Applying to textured skin: Be cautious highlighting bumpy or acne-prone areas can exaggerate texture. Stick to matte finishes in those spots.
- Forgetting to blend: Patchy highlight is never the goal. Always diffuse edges!
6. Pro Tips for That Next-Level Glow
- Mix a drop of liquid highlighter into your foundation for an all-over radiance.
- Use a tiny bit on your centre eyelids to create dimension.
- If your skin’s feeling dry, spritz a bit of facial mist before applying a cream or liquid highlighter, it’ll melt in beautifully.
Highlighter is one of those magical products that instantly makes you look more awake, radiant, and fresh when used right. Whether you’re going full glam or barely-there dewy, knowing how to apply highlighter and where to apply highlighter can truly transform your makeup routine. From cream to powder, liquid to stick, there’s a formula for everyone—and when applied well, it adds the kind of glow that makes people ask, “What’s your skincare secret?”
So go ahead and glow your way with light, confidence, and a touch of sparkle.